이번 포스팅에서는 본격적으로
Python 으로 블록체인 네트워크에 스마트컨트랙트를 배포해보겠습니다!!
과거에 REMIX IDE에서 솔리디티로 진행했던 내용인데요!!
간단한 스마트컨트랙트 실습!!
// SPDX-License-Identifier: MIT

pragma solidity ^0.8.7;

contract FirstContract{
    int private number = 1000;
    uint public uNumber = 100;

    function callNumber() public view returns(int){
        return number;
    }

    function addOne() public {
        number = number + 1;
    }

}
위
drfirst.tistory.com
// SPDX-License-Identifier: MIT
pragma solidity ^0.8.7;
contract FirstContract{
int private number = 1000;
uint public uNumber = 100;
function callNumber() public view returns(int){
return number;
}
function addOne() public {
number = number + 1;
}
}위 의 스마트컨트랙트를 파이썬으로 배포해보고 호출해보아요!!!
패키지 및 내 지갑정보 호출. 지난포스팅에 다룬내용으로
빠르게 넘어갑시다!
from web3 import Web3
from solcx import compile_standard, install_solc
import json
import os

BINANCE_ADR = "https://bsc-dataseed1.binance.org"
ETH_ADR = "https://rpc.ankr.com/eth"
BINANCETEST_ADR  = "https://data-seed-prebsc-1-s2.binance.org:8545"

my_wallet = '{나의 메타마스크 지갑주소}'
my_password = "{나의 메타마스크 지갑 비밀번호}"

chain_id = 97
이제 해당 솔리디티 코드를 그대로~~ 넣고 컴파일을 진행합니다
솔리디티 코드의 내용은 간단히 아래아 같습니다.
1. solidity 0.8.13을 사용
2. number변수는 1000, uNUmber는 100
3. callNumber 함수는 >> number변수 호출 ( view함수로 단순 조회)
4 addOne 함수는 >> number 에 1을 더함! (가스비 내야함!)
contact_list_file3  = '''
// SPDX-License-Identifier: MIT

pragma solidity ^0.8.13;

contract FirstContract{
    int private number = 1000;
    uint public uNumber = 100;

    function callNumber() public view returns(int){
        return number;
    }

    function addOne() public {
        number = number + 1;
    }

}

'''
compiled_sol = compile_standard(
    {
        "language": "Solidity",
        "sources": {"plus.sol": {"content": contact_list_file3}},
        "settings": {
            "outputSelection": {
                "*": {
                    "*": ["abi", "metadata", "evm.bytecode", "evm.bytecode.sourceMap"] # output needed to interact with and deploy contract
                }
            }
        },
    },
    solc_version="0.8.13",
)
# print(compiled_sol)
# with open("compiled_code.json", "w") as file:
#     json.dump(compiled_sol, file)

# get bytecode
bytecode = compiled_sol["contracts"]["plus.sol"]["FirstContract"]["evm"]["bytecode"]["object"]
# get abia
abi = json.loads(compiled_sol["contracts"]["plus.sol"]["FirstContract"]["metadata"])["output"]["abi"]
이제 테스트넷에 접속해서,
위의 컴파일 정보를 transaction 내에 넣고,
거래를 서명한다음!!!
진행시켜서 영수증을 받습니다!
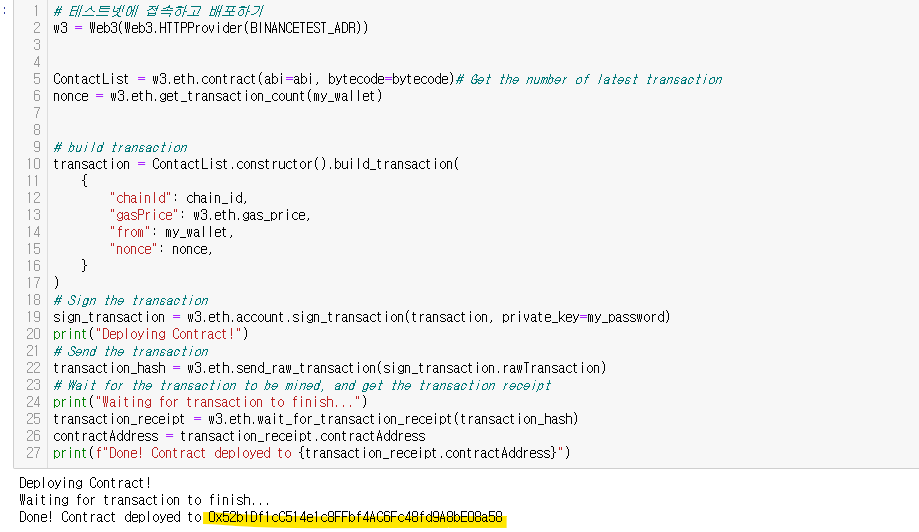
# 테스트넷에 접속하고 배포하기
w3 = Web3(Web3.HTTPProvider(BINANCETEST_ADR))


ContactList = w3.eth.contract(abi=abi, bytecode=bytecode)# Get the number of latest transaction
nonce = w3.eth.get_transaction_count(my_wallet)


# build transaction
transaction = ContactList.constructor().build_transaction(
    {
        "chainId": chain_id,
        "gasPrice": w3.eth.gas_price,
        "from": my_wallet,
        "nonce": nonce,
    }
)
# Sign the transaction
sign_transaction = w3.eth.account.sign_transaction(transaction, private_key=my_password)
print("Deploying Contract!")
# Send the transaction
transaction_hash = w3.eth.send_raw_transaction(sign_transaction.rawTransaction)
# Wait for the transaction to be mined, and get the transaction receipt
print("Waiting for transaction to finish...")
transaction_receipt = w3.eth.wait_for_transaction_receipt(transaction_hash)
contractAddress = transaction_receipt.contractAddress
print(f"Done! Contract deployed to {transaction_receipt.contractAddress}")
이렇게 진행하면!! contractAddress에 배포된 스마트컨 트렉트의 주소가 저장되어요~!
이제해당 Contract 를 호출해서, 내부의 Callnumber 함수를 호출한다면
솔리디티 코드에서 기획한대로 1000이 호출됩니다~!

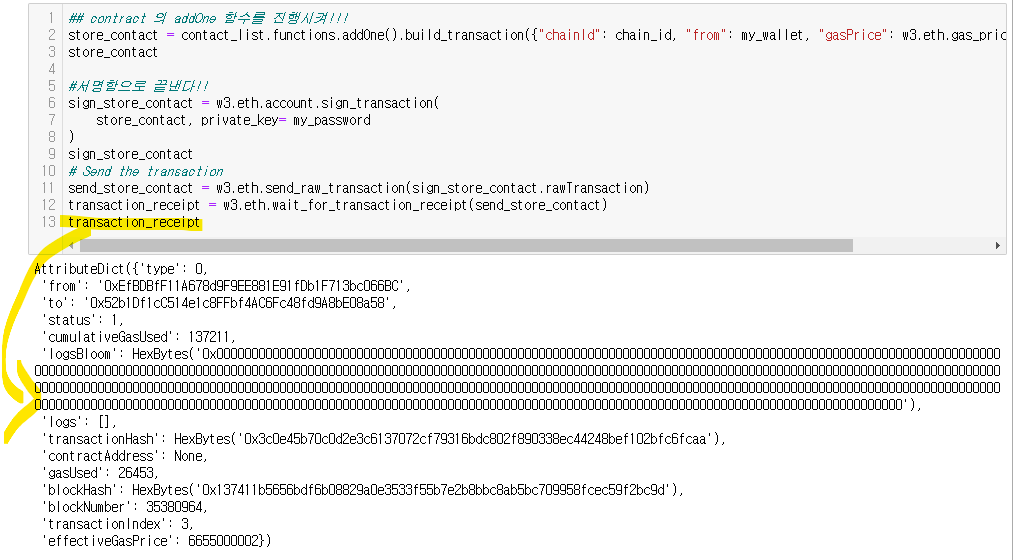
이번엔 숫자를 더하는 (단순 view함수가 아니어서 가스비를 내고 진행해야하는)
addOne 함수를 진행시켜봅싣다!!
## contract 의 addOne 함수를 진행시켜!!!
store_contact = contact_list.functions.addOne().build_transaction({"chainId": chain_id, "from": my_wallet, "gasPrice": w3.eth.gas_price, "nonce": nonce + 2})
store_contact

#서명함으로 끝낸다!!
sign_store_contact = w3.eth.account.sign_transaction(
    store_contact, private_key= my_password
)
sign_store_contact
# Send the transaction
send_store_contact = w3.eth.send_raw_transaction(sign_store_contact.rawTransaction)
transaction_receipt = w3.eth.wait_for_transaction_receipt(send_store_contact)

## contract 호출하기
contract_list = w3.eth.contract(address=contractAddress, abi=abi)
print(contract_list.functions.callNumber().call())
잘 진행되면 아래 이미지와 같이 거래 영수증이 잘 발급됩니다!!
그렇다면!! 정말 숫자의 정보가 바뀌었을까요!?
다시 한번 callNumber를 확인해본다면~~

정말 기존 1000 에서 1001로 바뀐것을 확인할 수 있지요!
여러분들도 아래 코드를 그대로 복사해서 사용해보세요!!!
바이낸스 테스트넷에서
제가 배포한 컨트랙트를 찾아 숫자를 보여줄것입니다!!
from web3 import Web3
import requests
import json
from solcx import compile_standard, install_solc

BINANCETEST_ADR  = "https://data-seed-prebsc-1-s2.binance.org:8545"
w3 = Web3(Web3.HTTPProvider(BINANCETEST_ADR))

contract_list = w3.eth.contract(address="0x52b1Df1cC514e1c8FFbf4AC6Fc48fd9A8bE08a58"
                                , abi=[{'inputs': [],
                                      'name': 'addOne',
                                      'outputs': [],
                                      'stateMutability': 'nonpayable',
                                      'type': 'function'},
                                     {'inputs': [],
                                      'name': 'callNumber',
                                      'outputs': [{'internalType': 'int256', 'name': '', 'type': 'int256'}],
                                      'stateMutability': 'view',
                                      'type': 'function'},
                                     {'inputs': [],
                                      'name': 'uNumber',
                                      'outputs': [{'internalType': 'uint256', 'name': '', 'type': 'uint256'}],
                                      'stateMutability': 'view',
                                      'type': 'function'}])
print(contract_list.functions.callNumber().call())
다음 포스팅으로는 파이썬으로 NFT를 민팅하는 작업을 진행해보겠습니다.
'블록체인 > [파공이]파이썬으로 공부하는 이더리움(Web3)' 카테고리의 다른 글
| 파이썬으로 스마트 컨트렉트 배포하기 (w. solidity) ① - 준비 (1) | 2023.11.25 |
|---|---|
| [web3] 이더리움 블록체인으로 나만의 계산기 만들기!!(feat. Python) (0) | 2023.03.28 |
| [web3] 이더리움 블록체인에 나만의 메세지 입력하기!!(feat. Python) (1) | 2023.03.28 |
| [web3] 이더리움의 테스트넷 세폴리아(Sepolia ) 메타마스크에 추가하기!! (0) | 2023.03.27 |
| [Web3] Python으로 접속하는 이더리움 체인 (0) | 2023.03.20 |


댓글